In this tutorial, I will go through installation and usage of dynamic analysis tool (DroidBox) for Android APKs. If you face some problems during installation, you can try a couple of things given in Troubleshooting section.
Step 1: Build Environment
I have installed Ubuntu 12.04 (32 bit) on Oracle VM Virtualbox. And according to Droidbox website, it can only be run on Linux and Mac, but not on Windows. And don't forget to install other dependencies for android SDK and Numpy/Scipy given below.
If you have not installed android SDK, follow the instructions here to get everything installed. Get API level 7 (2.1) installed for this tutorial. My installations are as per the settings (directory locations etc.) given in that link.
Step 2:
Open terminal and export the path for the SDK tools, if you have not followed the link for sdk installation.
export PATH=$PATH:/<path/to/android-sdk>/tools/
export PATH=$PATH:/<path/to/android-sdk>/platform-tools/
Step 3:
Change directory to Downloads and download Droidbox.tar.gz file.
$ cd Downloads
$ wget http://droidbox.googlecode.com/files/DroidBox.tar.gz
Step 4:
If you are using Ubuntu 12.04 (32 bit), you can use following commands otherwise, go to the website and install relevant binaries for Numpy and Scipy.
If git is not installed,
$ sudo apt-get install git
$ git clone git://github.com/numpy/numpy.git numpy
$ git clone git://github.com/scipy/scipy.git scipy
Step 5:
During installation, I got an error like I need to install python-dev, so
$sudo apt-get install python-dev
Now we need to install numpy and scipy.
$ cd /Downloads/numpy
$ python setup.py install --user
Let it run and check at the end that you don't get any error.
$ cd /Downloads/scipy
$ python setup.py install --user
Step 6:
Now install MatPlotLib
$sudo apt-get install python-matplotlib
Step 7:
Now if you have installed SDK as given in the link, you need to keep a few things in mind.
You need to run eclipse with the root user, not with sudo. And after fresh installation, you wont be knowing root password. So lets first change password first and then login with the root to run eclipse.
$ sudo passwd root
and choose password for root. Now login with root
$ su root
after logging in,
# cd /usr/local/eclipse
# ./eclipse
Step 8:
Now create an AVD and if you face some error like
'PANIC: cant load AVD etc' or 'Failed to load libGL.so' etc,
Run following command
# apt-get install libgl1-mesa-dev
Command Line AVD
However, if you want to create an AVD by command line, follow instructions given here.
At the end of this step, I assume, you have already created an AVD for API Level 7 with name 'test'. And you dont need to start emulator now.
AVD Location
Here are two things now. If you have created an AVD through Eclipse, AVD will be stored by default under root user because you ran it with the root user. Your created AVD will be at /root/.android/AVD/ .
If you created an AVD with command line and normal user, AVD will be stored under /home/mohsin/.android/AVD/
Step 9: Path Settings
Now Droidbox website says, you download and extract Droidbox anywhere, but I think, they should clearly talk about path settings in the shell scripts also. This missing information definitely took my hours.
Anyway, open startemu.sh file in Droidbox directory, give path to the emulator like below
/opt/android-sdk-linux/tools/emulator -avd $1 -system images/system.img -ramdisk images/ramdisk.img -kernel images/zImage -prop dalvik.vm.execution-mode=int:portable &
Open droidbox.py and give paths to monkeyrunner and adb so that they finally look like following:
call(['/opt/android-sdk-linux/
call(['/opt/android-sdk-linux/platform-tools/adb', 'logcat', '-c'])
Step 10:
Now it's party time. Lets run emulator and install APK for analysis. Make sure you are logged in as a root if you have created an avd with the emulator.
./startemu.sh test
It will automatically get path of test.avd.9) Get your APK and give it to droidbox for analysis.
./droidbox.sh <file.apk> <duration in secs (optional)>
e.g.
./droidbox.sh ./HippoSMS.apk 100
If you give 100 as a parameter, it will analyze for 100 seconds otherwise, you will have to do Ctrl+C to stop it.
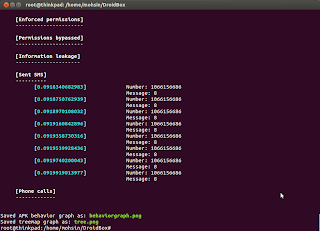
Here is the output for one of the samples of HippoSMS malware.
--
--
--
--


hi sir...is it anlysis on apk must using linux?? why not window??or is it optional?? what is the diffrent using window and linux when analysis on apk??
ReplyDelete"And according to Droidbox website, it can only be run on Linux and Mac, but not on Windows."
DeleteIt may be due to dependencies which might be available on Linux and Mac but not on Windows.
oh i see, actually i am doing android malware dynamic analysis, i have no idea on how to setup the enviroment, what operating system and what software is need to use?? The data i wan to get is the incomming/outgoing network traffic,system call, connection port, the background process that run by malware, the file that create by malware. Do u have any idea??
DeleteHi, i hope really if you can answer my question cause i am kind of blocked here, i am using droidbox for dynamic analysis of android applications and when i execute this command
ReplyDelete./droidbox.sh ./myapp.apk 100
it gives me the following error
Failed to analyze the APK. Terminate the analysis.
can you please help me in this